Monday 30 January 2012

Roasted potato, squash and apple salad


The amount of meals I eat that are not cooked inside my home is at an all time low these days. I look forward to cooking, trying new ingredient combination at home, taking my dorky little pictures and writing my silly little stories. This weekend though I ate out three times - and I loved every minute of it. Two of those time were at the same restaurant, Trattoria, an Italian restaurant in Kitsilano. Friday night Mike and I thought we were meeting Mike's parents for dinner, however an as yet unsolved miscommunication occurred, placing us there on the wrong day. It was a busy Friday day so it was nice to arrive at the restaurant and unwind with a glass of wine. When we realized we had mixed up the date we opted to stay and eat. That evening, I ate an incredible pizza topped with squash, carmelized onions and gorgonzola; it was truly amazing.


We returned to the restaurant the next night, the proper parent-meet night, and I decided to try the risotto which also happened to be a squash and gorgonzola dish with spiced walnuts. I had never tried risotto at a restaurant before and did not know what to expect. It turned out to be really good; it was creamy and al dente at the same time. When I make risotto I never make it al dente but I can see the appeal. As a side dish to share we ordered what turned out to be a magnificent brussel sprout, chestnut and balsamic recipe. I was surprised at how delicious it was, probably one of the most unexpectedly tasty things I have tried in recent history.


A friend of mine has also organized for myself and a couple of friends to take on a community garden plot in Vancouver. Sunday morning was our first day out to the garden for a 'work party' which we spent working on common garden tasks such as weeding the paths and picking up garbage. It was pouring rain that morning, I was soaked and chilled to the bone after an hour, but it was fun to pick our plot (if we get the one we want we will be right under an eagles nest!) and also nice to be up and out-and-about on a Sunday morning. After the garden party we went for brunch at Slickity Jim's, a breakfast place on Main street. This establishment recently relocated south on Main street after a fire closed down their old location.


The only thing I cooked this weekend was this salad which turned out very flavorful and satisfying; I liked the addition of the apple which added a nice sweetness. It is best eaten right away, while still warm but if you do store it and eat it later it is best with some freshly squeezed lemon juice or soft goat cheese. You probably don't need to use all of the spices I did. My motivation behind the selection was basically that I wanted to try grinding some spices in my new mortar and pestle. Is that not a good enough reason?


Roasted potato, squash and apple salad
Winter seasonal: squash, apple and potato

Ingredients
1/2 delicata squash, peeled and chopped in cubes
8 red new potatoes, chopped
1 tbsp grape seed oil
2 tsp curry powder
Sea salt
3 garlic cloves, crushed

2 small apples peeled, cored and cubed
1 tbs grapeseed oil
1 tsp honey (agave or maple syrup for vegans)

2 cups cooked chickpeas
1/2 tsp black mustard seeds
1/2 tsp yellow mustard seeds
1/2 tsp cumin seeds
2 pods cardamom

2 cups spinach, chopped
Meyer lemon zest and juice

Directions
1 - Preheat oven to 400F
2 - Bring salted water to boil in a pot, add chopped potatoes and boil about 5 - 6 minutes. Drain well.
3 - In a ovenproof dish toss potatoes and chopped squash with oil, curry powder, garlic cloves and sea salt. Alternatively you can spread on a baking sheet. This depends on whether you like your vegetables softer (in a baking dish) or more dry and crispy (baking sheet).
4 - Toss apple pieces in a tsp of oil and with honey - add to potatoes and squash or place in a separate dish. 
5 - Roast vegetables and fruit about 30 - 40 minutes until cooked through and lightly browned. Turn/mix once or twice.
6 - Meanwhile, roast spices (mustard seeds through cardamom seeds) in an iron skillet or pan until aromatic, about 5 minutes. Grind spices with a mortar and pestle.
7 - Turn up the heat in skillet to medium high heat. Mix chickpeas with spices and brown lightly in the skillet for a few minutes.
8 - Removes vegetables from oven and let cool a couple of minutes. 
9 - Mix vegetables and apple with chickpeas and spinach.
10 - Serve salad topped with freshly squeezed meyer lemon (or regular lemon) juice and grated zest. Soft tangy goat cheese is also a nice topping.

Friday 27 January 2012

Spaghetti squash with roasted tomatoes and pistachio-basil pesto


So this is not exactly a seasonal recipe. At granville island on the weekend I found some gorgeousely red little baby tomatoes that claimed to be grown in BC, surely in a green house. Upon tasting these maraschino red tomatoes at home I realized their appearance was very decieving. They tasted like water. Roasting them was the only way to redeem the money I spent on them. Also, I went to pick up a small bit of basil over the weekend for risotto but only large bags were available at the store. I was determined to use the basil in some pesto before the leaves turned black.


I also picked up a spaghetti squash from the farmers market this weekend and was pretty excited about making a spaghetti-impersonating recipe with roasted tomatoes and fresh basil. The recipe as a whole was great. Sadly, my spaghetti squash was a serious let-down. I have only made spaghetti squash once before and I remember it being delicious roasted, all on its own. I remember the spaghetti strands emerging almost like magic from the squash following baking. The squash I made today was tasteless and mushy and the strands were more like strings. Luckily the roasted tomatoes and pesto I used were full of flavour and so the final product was edible.

I plan on trying this recipe again immediately just to make sure there was not something seriously incorrect in my squash cooking process. Plus, the vision I had in my head of what I was exited to eat ended up so different than what I got. I need to satisfy my spaghetti squash craving. I wonder if the squash I used was even a spaghetti squash...


Less about the bad and more about the good. The good was the basil-pistachio pesto I made this evening. I decided to try my hand at pesto-making using my shiny new mortar and pestle (thank you Katherine for the Christmas gift card). The process was a little awkward at first. I started with some stirring, some banging, some side to side swiping. I was not sure exactly how to proceed but somehow, eventually, the green glop came together and was super tasty.


Spaghetti squash with roasted tomatoes and pistachio-basil pesto
The extra pistachios in this recipe are essential to add some crunch to the final dish. If you are more partial to pine nuts, then use them instead of the pistachios.

Ingredients
1 spaghetti squash
Extra virgin olive oil
15 grape tomatoes, cut in half
4 garlic cloves, divided
3 basil leaves, chopped
3 tbsp raw or roasted pistachios
fresh paremsan 

Pesto ingredients (makes about 1/3 cup) 
1 garlic clove
Sea salt
2 cups loosely packed basil leaves, chopped
Extra virgin olive oil
1/4 cup parmesan
3 tbsp raw or roasted pistachios 

Directions
1 - Preheat oven to 350F.
2 - Cut squash in half, remove seeds, brush inside with olive oil and season with salt.
2 - Place squash on a baking sheet, cut side down.
3 - In a bowl, mix sliced tomatoes with basil, 2 crushed garlic cloves and sea salt.
4 - Spread on a baking sheet next to squash or on a separate sheet if needed.
6 - Roast tomatoes and squash about 1 hour.
7 - Also, wrap 2 garlic cloves in foil and roast with vegetables.
8 - Roast pistachios (for both pesto and final dish) in a pan for about 5 minutes if you are starting with raw pistachios. Monitor often, shake a few times, and be careful not to burn them.
9 - Meanwhile, make pesto in a food processor or with mortar and pestle. With mortar and pestle, start by mashing together the garlic and some sea salt.
10 - Next, add basil leaves (pre-chopped into smaller pieces) and mash until paste-like, dark green and mushy.
11 - Mash in about a tbsp of olive oil or more if desired.
12 - Grind in the parmesan, a little bit at a time until you like the consistency.
13 - Lastly add in the pistachios. And yes, keep mashing. 
Note: If the pesto is too wet for your liking add more pistachios or parmesan. If it is too dry, mix in more oil or even some lemon juice.
14 - Remove garlic, squash and tomatoes from oven. 
15 - When cool enough to handle but still warm/hot, scrape spaghetti-like strands from squash, using a fork, into a bowl.
14 - Into the squash, mix half of the pesto. Then toss in mashed/pressed roasted garlic cloves and season mixture with salt.
15 - Serve immediately squash mix topped with roasted tomatoes, pesto, chopped and roasted pistachios and grated parmesan.

Wednesday 25 January 2012

Beet, apple & pear stack with spinach & blood oranges


I have been confused and see-sawing between calling my recipes autumn and winter seasonal over the past few months. I realize now that this is because the season was officially winter but the weather was still pretty fall-like. Last week we finally felt the true chill of winter. With this chill the selection of vegetables at the farmers market has dropped. And with that, the list of in-season produce on eatlocal.org has dwindled.

Cooking seasonally now means you are cooking with apples, beets, pears and potatoes. And squash. If you are okay with sourcing some seasonal food from California then you can add a delicious array of citrus to that list. You would be crazy not to take advantage of the dazzling multitude of orange, red, green and yellow citruses that only make an appearance for a short time each year.


Today, I stayed home to prepare for a virology class I have to teach tomorrow and to do some online pre-training courses for a deep-sequencing (what is that?! even I barely know but I hope to find out) training session I have to attend tomorrow. I spent way more time in the kitchen then I should have, playing with food, instead of working like I ought to have been. I seem to have accomplished all my tasks at this moment though, so, good for me. 

I wanted to make a very wintery salad with beets, apples and pears. I had planned to cube everything up and toss it with some spinach and goat cheese but could not resist slicing everything up with the mandoline my mom bought me for christmas. I have been using it regularly since I brought it home to slice everything from avocado and fennel to oranges, beets and parmesan.

Thus, I thinly sliced a pear (which was perfectly ripe I might add), a cute red apple (I forget which kind) and a couple pre-roasted beets all from the winter farmers market. I stacked the ultra-thin slices and served them with a mix of spinach and could not help but throw a blood orange in there as well.


Biting into a thick stack of thinly sliced apple, beet and pear, tossed in meyer lemon juice was divine. Unfortunately my salad was ruined by a not so good goat cheese. Also I used freshly ground pepper which I regretted post-consumption (luckily I took pictures before I added those things so you don't have to imagine it without them). If you do try this recipe add some goat cheese only if you have the tangy, fresh, soft kind of goat cheese. If you have a drier, salty feta on hand, skip it. And honestly, the beets, apple and pears would have sufficed on their own, maybe with some soup or a biscuit. With the spinach and blood orange I felt like I was eating a salad with a salad. 


Also, I did not invent this stacking idea, as beautiful as it is. One of the first images I ever saw that both inspired and intimidated my food documenting and experimenting was this legendary post from Canelle et Vanille which clearly influenced the fun I had with my mandoline today.


Beet, apple & pear stack with spinach & blood oranges
Winter seasonal: beet, pears, apples, meyer lemon and blood oranges
Beets can be roasted in a covered clay pot, with an inch of water, for 45 minutes at 350F.

Ingredients (for 2 large salads)
1 firm but ripe pear
1 small apple
2 small beets, pre-roasted
2 blood oranges
2 cups fresh spinach
1 meyer lemon, squeezed and zested
1 tbsp extra virgin olive oil
Sea salt
1 tsp honey (agave or maple syrup for vegans)

Directions
1 - Thinly slice beets, pear and apples using a mandoline slicer on the thinnest setting.
2 - Brush apple and pear slices in meyer lemon juice to keep from browning.
3 - Roughly chop spinach and segment blood oranges, reserve any extra juice for dressing.
4 - Whisk together 1 tbsp of meyer lemon juice, honey, olive oil, sea salt and any blood orange juice released during segmenting.
5 - Toss spinach in dressing, place on a plate with blood oranges.
6 - Arrange/stack in alternating fashion: beets, apples and pears next to spinach and blood oranges. Garnish with lemon zest.

Sunday 22 January 2012

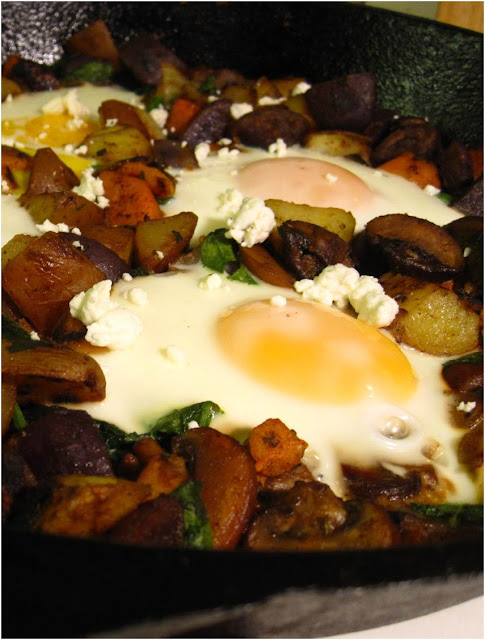
Skillet breakfast with arugula, mushroom, new potato, yam and goat cheese


If I had to guess where my love of cooking started, I would probably pinpoint it to my dad. Sunday mornings, as far back as I can remember, my dad's only day off from a long work week, he would make big breakfasts for the family. He liked to make his own hash browns using potatoes he would cut, boil then store in the fridge the night before and would cook them in the morning until deliciously crispy with green onions. There was always bacon to go with the hash browns and eggs that he would cook to everyone's personal preference. I hated runny yokes so mine would be over-hard or scrambled. Over time I have started to enjoy my yolks a little runny but in my mind there is a very fine line between a perfectly cooked egg and a revolting slightly undercooked egg.


My dad would also make French toast quite regularly which, for himself, he would smother in ketchup. I was completely grossed out but my sister would imitate my dad and also put ketchup on her French toast. The French toast he made though always had the perfect texture, chewy and crispy around the edges, not soggy, the way I still prefer my French toast. He was not a fan of syrup but eventually started to make his own not-too-sweet blueberry sauce for French toast and pancakes. He also made delicious super cheesy omelets but I would hate it when he put mushrooms in them. Being the bratty picky eater I was would complain about the mushrooms and pick them out. Funny since mushrooms are now one of my favourite breakfast ingredients.


Following from my dad's example, breakfast became the first meal I remember cooking on a regular basis. When Mike and I started dating I would focus on cooking the most perfect bacon for our regular big breakfasts. The first time living on my own in Saskatoon the thing I ate most often was homemade breakfast sandwiches, any time of day. A meal of hash-browns, scrambled eggs and chopped up bacon, all mixed into one big mess was another of my favourites and was not limited to morning meals.

Since I made my first skillet breakfast a few weeks ago it is the only thing I want to make. The recipe I am posting today I made last weekend but made another similar one this morning. I am trying to experiment with different ingredients. Next weekend I might try something risky, like make a tomato sauce based skillet. Stay tuned...


Skillet breakfast with arugula, mushroom, new potato, yam and goat cheese 
Winter seasonal: thyme, garlic, potatoes, mushrooms (based on eatlocal.org)
Winter squash is also a delicious ingredient for a skillet and cooks much faster then potatoes, try subbing it for the sweet potatoes and mushrooms. Instead of thyme and arugula try topping with fresh basil and mozzarella. For an extra kick season with a touch of curry powder and smoked paprika. 

Ingredients
1/2 sweet potato chopped
2 cups chopped new potatoes
2 tbsp butter
1/2 cup chopped onion
2 garlic cloves, crushed
6 brown mushrooms thickly sliced
1 tbsp fresh thyme
1 tbsp lemon juice
2 cups chopped arugula
Sea salt
4 free-range eggs
Goat cheese

Directions
1 - Preheat oven to 350F.
2 - Bring about 4 cups of salted water to boil in a pot.
3 - First add regular potatoes, boil about 3 minutes, then add sweet potato, boil 3 more minutes (times may vary depending on the size of your potato pieces). Drain well.
4 - Melt butter in large ovenproof skillet over medium heat.
5 - Add mushrooms, shallots, garlic, thyme and potatoes. Season with sea salt.
6 - Cook until onion is soft, and both mushrooms and potatoes are lightly browned and thoroughly cooked through, about 10 minutes.
7 - Near end of cooking time, add lemon juice to skillet.
8 - Take skillet off of heat, stir in arugula and allow skillet to cool slightly while arugula wilts.
9 - Make 4 wells between the cooked vegetables where you will break in the eggs. Add a tiny dab of butter to each well that will keep the eggs from sticking.
10 - Carefully break open eggs and add one to each well.
11 - Grate fresh pepper and sea salt over eggs.
12 - Place skillet in oven and cook approximately 8 minutes or until eggs are cooked to desired done-ness. Or you can cook about 5 minutes then place under the broiler to cook the top of the eggs quickly.
13 - Top skillet with crumbled goat cheese and serve hot.

Friday 20 January 2012

Roasted fennel, pomegranate, orange and avocado salad


Busy, busy, busy. I am attempting to transition from my lab at UBC where I did all the research for my PhD to my new headquarters at the BCCDC. I have promised my time and services to my former supervisor until April but have also agreed to start some part time work with my new employer. I am trying to be discrete in my attempt to do two jobs at once but it is turning out to be more difficult then I had hoped. Especially since I am having a hard time doing any work at all...


Moving on. I have had an enormous appetite the past few days. I am not sure but I think it has something to do with my body rebelling against my attempt to eat less food and more healthily. I made today's recipe to go with some paneer curries and rice because I wanted some vegetables in my meal. 

I am still managing to stay seasonal with this recipe but unfortunately not local. In fact, I am suffering form extreme citrus envy right now; check out the beautiful Citrus Salts made by Heidi Swanson in San Fransisco. Also, drool over the marmalade crostata on the Desserts for Breakfast blog (in Berkeley) and these breathtaking (as usual) pictures on the Canelle et Vanille blog taken at a Florida Citrus grove.


Fennel is also wonderfully in season right now. Have you ever had roasted fennel before? It is so so so delicious. You don't even need all the other stuff I have in this recipe, but I had a pomegranate and an avocado that I bought 2 weeks ago, in the fridge. These suckers needed to get used. Fortunately these simple ingredients tasted incredible together. 
As for pomegranates, you never know when you pick one up what lies inside. On this occasion I hit the jackpot. Look at those juicy, plump, ruby red seeds!


Roasted fennel, pomegranate, orange and avocado salad
Winter seasonal: pomegranate, orange and fennel 
My only warning for this recipe: take the fennel out of the oven while it is still moist, don't let it dry out or it will get chewy and tough. If you want to make this dish more filling I am sure it would go nicely with some quinoa or couscous, maybe tossed in some lemon juice and olive oil.

Ingredients
2 fennel heads, defronded
1 pomegranate
2 small navel oranges
1/2 avocado, sliced
2 garlic cloves
Sea salt

Directions
1 - Preheat oven to 300F.
2 - Slice fennel heads into large slices about 1/4" thick (I used a mandoline at the thickest setting).
3 - Brush both sides of fennel with olive oil and place on a baking sheet, season with sea salt.
4 - Wrap garlic cloves, unpeeled, in tinfoil.
5 - Place garlic and baking sheet with fennel in oven.
6 - Roast fennel about 10 - 15 minutes per side (until lightly browned), turn and roast another 10 minutes.
7 - Meanwhile, cut pomegranate in half (not from stem to stem but through the other way). Scoop out seeds into a bowl, squeezing the cut half a couple of times to get some juice into bowl.
8 - Cut orange segments into a bowl, squeeze some orange juice from left over scraps into bowl.
9 - Remove fennel and garlic from oven.
10 - When garlic is cool use a garlic press to squeeze the softened flesh into bowl with fruit; whisk into the fruit and juice.
11 - Arrange fennel and avocado on a plate and top with orange and pomegranate mix.

Wednesday 18 January 2012

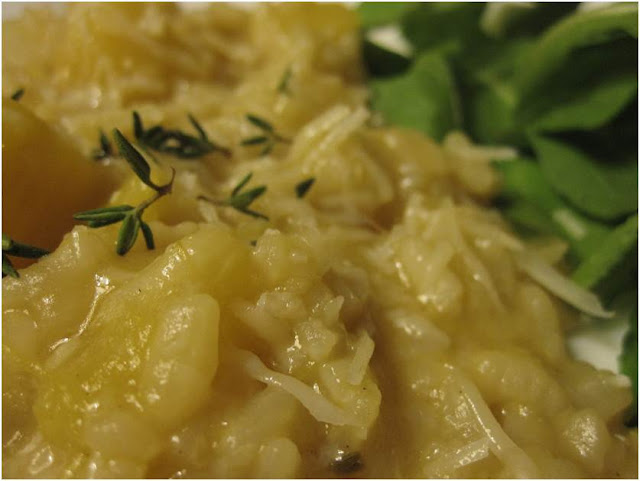
Leek and acorn squash risotto


I won't bore you with a story today. But I will tell you that I discovered that Google Chrome is awesome. Maybe I am behind in the times but I just got around to installing this life changing browser yesterday. I have been using Firefox for the past 5 years which has served me just fine until about 6 months ago. My computer has been freezing constantly for quite awhile now. I finally realised this only happens when Firefox is open. It has become so awful that anytime I click on one thing, my computer takes a full 30 seconds to process (change windows, tabs, website etc). I tried switch to Explorer but found it also to be slow.


Sunday night, I downloaded Google Chrome and my computer has not frozen since. I can browse as many websites as I want and have all the programs I want open without delay. I was seriously ready to burn my computer, why did I not think of this months ago? 

There is one problem. I realise that my website looks a little different in Google Chrome. Maybe it is my settings but all my words are too small. If I enlarge the font from my usual settings, the words are too big. I have to figure out a way to fix this because the way my website looks in Firefox is how I like it. So bear with me if you come for a visit and things look weird.


Tonight was the first time in a week I have made something worth talking about. I finally brought the arborio rice out of storage to make some delish risotto, something I have not made since last spring. It was a fitting dish to make for one of the coldest days of the year here in Vancouver. Last year, I had my technique and three risotto recipes perfected. I was a little rusty tonight but know exactly where I went wrong, I added my squash too late, didn't use enough salt and was missing basil.


The first time I ever made risotto, I was not sure what final product I was aiming for. 
Risotto is difficult to make if you have never had it before because it is hard to tell when it is done and what the final texture should be like. It was not until my friend Vesna had me over for supper and made the most amazing and decadent mushroom risotto that I realised what I was trying to achieve.

If you look at the two pictures above, I have captured what risotto looks like almost done, then completely done, as I see it. Can you see how on the left the rice still has its shape and the sauce is thin? On the right the sauce is thick and starchy and is holding the rice together which looks slightly less distinct. That is what I aim for, but you may prefer the rice more al dente, as I know some people do
.

When I make risotto it is usually the only thing I eat except for maybe a salad. It is very filling and this recipe makes a lot so you can count on having leftovers (something I am rarely ever able to count on with Mike in the house).


Leek and acorn squash risotto
Winter seasonal: leek, onion and winter squash
Depending on your preference you can make this dish with distinct pieces of acorn squash in the final product, or you can make it so the squash disappears into the sauce and the dish. If you prefer the latter, add the squash right in the beginning, with the onion and leek. If you want solid pieces, add it when I indicate in the recipe, sometime after the onion is cooked. Just make sure your squash pieces are not too big or they might not cook through by the end. If the first time you make risotto you are not impressed, try again, it is a dish that can take a while to master.

Ingredients
2 tbsp extra virgin olive oil
1 cup chopped onion
1 cup chopped leek (white and light green parts only)
1/2 cup dry white wine
1/2 of a small acorn squash (or other winter squash), peeled, seeded and chopped into 1/4" cubes
1.5 cups arborio rice
8 cups vegetable stock (try to find one without MSG...)
1 - 2 tbsp fresh thyme leaves
1 tbsp butter
1/2 cup freshly grated parmesan
Sea salt
Freshly ground pepper
Basil to garnish

Directions
1 - Heat oil over medium heat in a very large sauce pan.
2 - In a separate, large pot, bring 8 cups of vegetable broth to a near boil, turn down heat and keep hot while making risotto.
3 - Add leek and onion to oil in pan and cook about 8 minutes, stirring often, until soft but not brown.
4 - Stir in squash, mix in, then stir in rice.
5 - Continue to stir rice, letting it absorb the oil from the pan, it should turn slightly opaque, for about 3 minutes.
6 - Stir in wine, mix, then add about 1/2 cup of broth. Mix to combine and let simmer briefly and stir until liquid is mostly absorbed.
7 - For the next 20 to 30 minutes follow this procedure: add about 1/3 cup of broth to rice. Stir to combine. Let the rice and squash simmer in the liquid 30 seconds, stir again a couple of seconds. If broth is mostly absorbed add another 1/3 cup of broth and repeat; if broth is not absorbed let simmer another 30 seconds, then stir, adding broth when most of the liquid has been absorbed.
8 - Mix in thyme after about 15 minutes
Notes: 
***When you add the broth it should start to bubble right away; if it does not, either your broth or your rice is not hot enough. 
***The bubbling should be gentle, not vigorous. If the bubbling is intense, turn down the heat slightly, otherwise the liquid will evaporate too fast. 
***In the beginning, the liquid should absorb quickly, as you progress it will take longer and longer for the liquid to absorb. So you will have to stir and simmer more often near the end of the cooking time. 
***You don't need to be stirring the risotto non-stop. It is okay to regularly step back for a minute, then stir. But don't leave it more than a couple minutes or your rice will stick to your pan and it wont cook evenly.
9 - If you run out of broth, use hot water to continue cooking. Continue cooking until squash is soft, the rice is cooked through and the sauce is thick and starchy.
10 - When you think you have reached the perfect consistency, take a small spoonful, cool on a plate a few seconds, then taste. Continue to cook if it is not as soft as you would like. Add sea salt if needed and freshly ground pepper to taste.
11 - If it is done, stir in 1/2 of the parmesan and a glob of butter, mix well.
12 - Serve risotto topped with fresh parmesan, sea salt and pepper if needed, and fresh basil or thyme.

Saturday 14 January 2012

Roasted cauliflower, shallot, pistachio and green olive quinoa


It is absolutely incredible how the perception of time passing changes depending on the context of the present. With the situation of a terrifying or dreaded deadline looming in the future time whips past, leaving you with not enough hours in the day to accomplish what needs to be done or to relax or to enjoy yourself. In alarming contrast, when said deadline has passed, and the future becomes relaxed; minutes feel like hours, one work day feels interminably long, a week clunks by like a slow moving vehicle you curse when you get stuck behind.


Okay, so I do have deadlines, but none of them seem that important compared to what I just went through. Everything feels so...mundane...in comparison. Everyday, I get to the lab and I think, you just needed today to get back into it, tomorrow will be productive. If anything things are moving more and more slowly as the days pass. It is like I am in one of those awful dreams where you want to run but your legs are stuck to the ground or feel like cement. That is how I feel, only it is my brain that wants to run and it is time that is stuck in the cement. 


Maybe I am being a little dramatic. I do not want you to be as bored as I am, so I am trying to make being bored sound interesting. Also, my recipe for today may be a little boring, but it is healthy and a little different. I made this quinoa recipe wanting to use up the leftover cauliflower purchased for cauliflower steaks described in my previous post. I served this quinoa dish with some not-chicken fingers (not shown). For the not-chicken fingers I made a honey-mustard yogurt dip. Mike decided he liked the quinoa better with the yogurt dip mixed into it. I agreed, when I tried my second serving with the dip, which I will now call a salad dressing, mixed in to the quinoa.


Roasted cauliflower, shallot, pistachio and green olive quinoa
Autumn seasonal: cauliflower, cilantro, shallots
 
Ingredients
1 cup quinoa
1/2 head of cauliflower cut into bite sized pieces
1/4 tsp anise
1/4 tsp ground coriander
3 cloves garlic
3 shallots
Sea salt
1/2 cup pistachios, roughly chopped
1/4 cup chopped green olives
1/4 cup cilantro
Crumbled goat cheese, optional

Optional dressing
1/4 cup plain thick yogurt
Juice from 1/2 lemon
Sea salt to taste
2 tsp honey
1 tbsp grainy Dijon mustard

Directions
1 - Bring about 4 cups of water to a boil, add dry quinoa, and cook until tender, about 10 minutes
2 - Preheat oven to 400F.
3 - In an ovenproof skillet, heat 1 - 2 tbsp olive oil over medium heat and add cauliflower. Season with anise and coriander.
4 - Cook until brown then stir in the shallots and garlic.
5 - Place pan into oven and roast cauliflower for about 20 minutes.
6 - Drain quinoa and let cool. Stir in olives, pistachios and cilantro.
7 - If you find the quinoa too plain you can stir in the yogurt mustard dressing that is made by simply mixing together the yogurt, lemon juice, sea salt, honey and mustard. If you are serving the quinoa with a more complex dish I would omit the dressing.
8 - When the cauliflower is nicely browned and cooked through, remove from oven and serve piled onto the quinoa mixture.
9 - If you do not use the dressing, goat cheese is also a nice addition to the quinoa.

Thursday 12 January 2012

Cauliflower steaks with olive relish


I am not athletic. Growing up my parents never forced me to play any sports, so I did not. Also, in high school I was one of those girls who always skipped gym class. When I did show up I would hide in the corner, or behind other people, or I would forget my gym shoes or gym shorts, or fake injuries; whatever got me out of having to physically exert myself.

My life took a dramatic turn in my first year of university. I allowed myself to fall victim to the freshman 15...20. It seemed to happen all at once, all of the sudden I was no longer the stick person I had always been. For the first time in my life I was motivated to exercise. I started at the gym, on the stair-master. Eventually I gained enough confidence to get on the treadmill and would run, maybe 5 minutes at a time. 


Over the years Mike has also tried to get me into some other physical activities like playing frisbee, tennis, biking and golfing. I even bought a snowboard the first year I moved to Vancouver but after a few painful mountain outings, my snowboard was banished to a dusty corner, unused for many years, except for the occasional borrowed adventure. Last winter, despite all of my efforts to avoid it, I ended up again on a mountain, with my snowboard and Mike. Somehow, Mike managed enough patience to spend the day with me and to teach me how to make it somewhat successfully down the hill (part of the decent was mediated by falls) and also how to turn on my board.

One of my most valid excuses for not going snowboarding was the cost of a lift ticket, it is expensive. This excuse was invalidated last winter when my friends started to go to Mount Seymour, only a 30 minute drive away, on Mondays for free ladies' nights. I was terrified to join in at first, that it was night, that I would fall off the lift, that it would be icy, that the drive up the mountain would be scary (I worry too much I know), but, somehow, I had fun. And I kept going and even improved a teeny bit.

This Monday, like last year, I was nervous for the first day out on the hill. As I said in my last post I am trying to relax, so I went out with some friends and was surprised how quickly I was able to pick up where I left off, not an expert but able to have a good time. Now, the memories of wintery Monday nights - riding up the chairlift, looking down on to the city and up at the stars, and speeding (sort of) down the crunchy white slopes - are coming back to me, making me a little less apprehensive about the cold rainy season ahead. The best part about Mondays? Pizza and beer at Campagnolo Roma after a night at the top of the world.


For Christmas, my mom got me a subscription for Bon Appetit magazine. I have a nice long list of recipes from this magazine that I am eager to try. The first recipe that caught my eye was this recipe for cauliflower steaks. The recipe sounded really simple and I worried it might be bland but the picture looked really appealing. I had to taste it. I made it for supper tonight and was pleased with the result. Mostly I really enjoyed the taste of roasted cauliflower. The olive relish adds some pizzaz to the steaks and a side of pasta makes for a more filling supper.  

Cauliflower steaks with olive relish
Adapted from Bon Appetit
I served a small side of pasta with the steaks to make the meal more filling. The original recipe is made with a tomato puree which I used as a topping for the pasta. Garnish with fresh parsley or basil and parmesan or goat cheese if desired.

Ingredients
1 cauliflower head (at room temperature)
1/2 cup kalamata olives, finely chopped
3 sun-dried tomatoes, thinly sliced
2 tablespoons chopped Italian parsley
1 tbsp fresh lemon juice
1 tsp balsamic vinegar
Freshly ground sea salt and black pepper
3 garlic cloves, quartered
5 plum tomatoes, quartered
2 - 3 cups prepared rotini

Directions
1 - Start by removing the leaves and trimming the stem of the cauliflower head but leaving the core intact.
2 - Slice the center of the cauliflower into four 1/2" steaks.
3 - Finely chop 1/2 cup of the cauliflower ends (not part of the steaks).
4 - In a bowl mix finely chopped cauliflower with chopped olives, sun-dried tomatoes, 1 tbsp of extra virgin olive oil, parsley, lemon juice and balsamic vinegar. Season with sea salt and pepper.
5 - Preheat oven to 400F.
6 - Heat 1 Tbsp olive oil in an ovenproof iron skillet over medium-high heat.
7 - Cook cauliflower in skillet, 2 minutes per side or until lightly browned.
8 - Put cauliflower steaks on a large baking sheet and place in oven. Roast cauliflower steaks for 15 minutes or until ready to serve.
9 - Add another tbsp of oil to skillet and add garlic cloves and tomatoes.
10 - Cook the tomatoes until golden browned, tossing once or twice.
11 - Roast garlic and tomatoes in oven for about 12 minutes
12 - Let tomatoes and garlic cool slightly then process in a food processor with a pinch of sea salt and a dash of lemon juice.
13 - Serve cauliflower steaks with olive/cauliflower relish, a small helping of pasta and pureed tomatoes.